Getting started
Let us give you a quick overview of how the proxy is used. In this section, we give you a quick introduction to the Dashboard and we’ll also set up a simple project.
Registration & Login
To use Easyling, you need to register and set up an account for the service at https://app.easyling.com. You can start using the service right away after registration.
Logging in, you will be taken to the Dashboard, which is the project management center, every detail of which we’ll get to in later sections of this manual. There will be no existing projects at the outset, so let’s try setting one up.
Setting up Your First Project
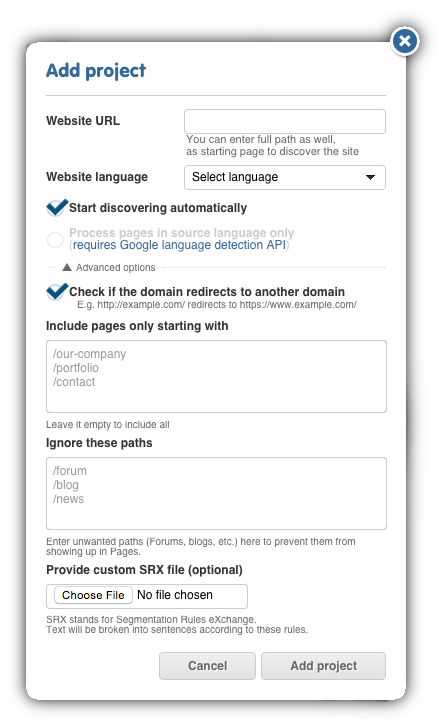
To do this, click on Create new project dropdown at the top and choose Add project.
This opens the Add project dialog box, where you can enter the URL of the website you would like to translate, and also select the website language; this sets the source language of the translation project. Click on Advanced Settings to access extended functionality, such as custom SRX files.
Add a Target Lanuage
You will also need to add your target language(s), so use the option on the Dashboard to add then to the project. It’s not just that there is not much to do in terms of translation without a target: many crucial features (including the Preview proxy and the entire Workbench) are entirely unavailable as long as no target languages are set.
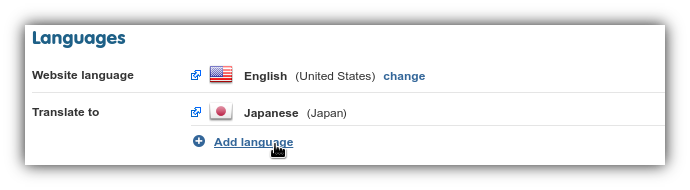
You can add any number of target languages. You can use the search function to lookup languages based on locale code or country name.
Running a Discovery
The next step is to figure out what (and how much of it) to translate and do it from a single target URL. For this, a Discovery has to be run on the site.
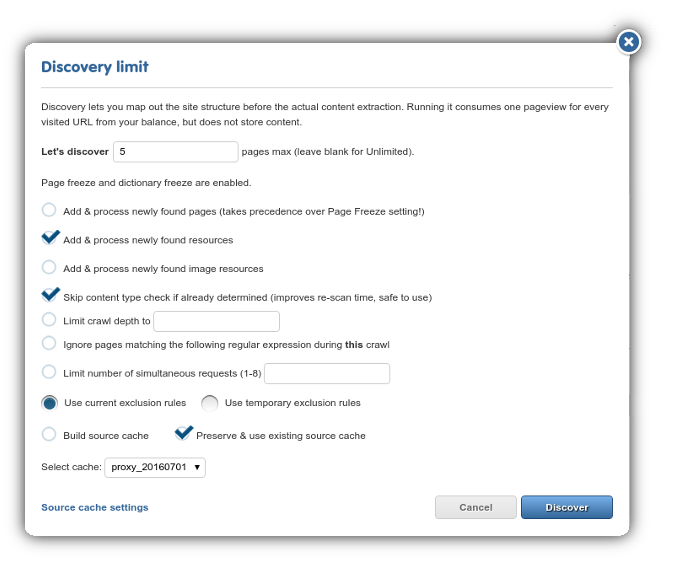
Discovering a website means running a crawler on it and allowing the proxy to ‘explore’ it in its entirety in order to provide Statistics for you. As you can see in the ‘Add project’ dialog window, the Dashboard is set up to automatically start a Discovery on a webpage after creating a project - but don’t worry! After clicking on the Add project button, a new dialog will open where you get to set up additional details of the Discovery before really starting the process.
There are many details that potentially have to be taken into account when setting up a truly effective Discovery, but let’s set those aside for the moment. For now, simply Click on the ‘Add project’ button and after the Discovery dialog opens, click on Discover to start a crawl on the website. The default settings are safe.
Depending on the size of the site, a Discovery can take quite some time to finish. A spinner on the Discovery page will indicate that the system is currently working, but there is a default page limit of 100, which means that if the Discovery finds more than one hundred pages, it will automatically exit, allowing you to fine-tune your settings.
After the process is over, you’ll receive an e-mail about the results. You also have your first Statistics from the Discovery - a word count total from all Discovered pages.
Giving a Quote
You can use the results of the Discovery to give a quote (based on unique source words) to your clients about the estimated work-hours and expenses you forecast for a given project.
The results are an accurate indication of the translation costs associated with the text. However, with websites, it is prudent to consider other (techincal) details before taking the word count results of the Discovery process at face value.
Investigate the source site and consider the following:
- Is there a great deal of dynamic content?
- Any Site Search functionality? A webshop? A forum?
- Any other web apps that would have to be localized?
- Do the average word lengths of the source and target languages differ significantly?
- Is the direction of the target language different than that of the source language?
- Which pages are targeted for translation? Which pages need to be excluded? Ask the client if they have a specific page list.
- does the site have mixed-language content? If yes, ask the client to specify the source language(s) they need translated.
- is there an extant Translation Memory that could be used?
- is there any region-specific content? Does the site use geolocation?
- is there any content behind a secure login?
- are there any subdomains? example.com and blog.example.com require two separate projects that need to be linked.
- are there any other special requirements?
- is there any Javascript-generated content?
If you answered yes to any of those questions, that will require some deliberation, often beyond the primary focus of translators: UI fixes and a measure of fiddling with what’s under the hood - take those expenses into account when you make your quote.
NOTE!: If you are unsure as to how to go about translating a part of a website, feel free to contact our Support Centre and we’ll help you get an accurate picture of the required effort and costs.
It is also advised to negotiate the expected workflow with the client at the quoting phase. The translation of a website is, in most cases, a never-ending process, as new content is added to the original site at certain intervals.
The question is, how content added after the initial quote should be treated - both from a technological and fiscal viewpoint. It is a good idea to ask the client about their intentions for update cycles and new content.
Do they wish to publish at the same time in all languages? Or publish on the original site without delay, and then publish the translations later, as they become available? The different options will require different approaches when you get to the maintenance phase of the project.
As a translation proxy is practically a translation layer on top of the original site, serving translations from the datastore by replacing original content on-the-fly, new content will not be replaced, as translation is not stored for that. In practice it means that newly added content will appear in the original language on the translated site. This is called bleedthrough. There are 2 approaches to this phenomenon: let bleedthrough happen, to make new content available right away, even if it is in a different language, or block new content from appearing until translation is done. Both have their clear advantages and drawbacks, so you have to discuss with your client which option is more acceptable for them - and set up your project accordingly.
Sales tool for mass production
Easyling also offers a Sales Tool to help LSPs and freelancers in growing their business.
If you have a well-defined group of potential customers you’d like to offer your translation services to, like hotels or restaurants with only monolingual websites in your area, the translation proxy makes it easy for you to impress the business owners. Just collect the URL addresses, add them to the Sales Tool, and the translation proxy will automatically create a project for all webpages according to the settings you specify. Once the translation and post-editing of the translated main pages are ready, you can send a link to the business owners. If your potential clients are impressed with the translated page and the fact that no IT involvement is required on their end, you have a better chance to win the deal.
On the Workbench
You can export all source segments, translate them in your CAT tool of choice and then reimport your results. But going through that cycle for every small change would get rapidly tedious - wouldn’t it be great if you could edit & control your translations in the cloud, where it would all update in real time? You’re looking for the Workbench.
In Pages View, you can hover over any page - a menu will show up right next to it - choose ‘Translation in List View’ and you’ll be taken to the Workbench in a different tab.
If the Dashboard is the Project Management Center in Easyling, then the Workbench is the cloud CAT tool, where translation itself takes place. There are many features you can use in the Workbench to make working with websites easier - see the ‘Workbench’ section of this manual for the details.
The 3-Phase Workflow
Barring some detail (withheld for the sake of a convenient introduction) the above process is all that you need to get a website translation project going.

Our idea of a project’s lifetime can be summarized in the 3-phase Workflow.
1. Discover & Quote
Set up a project and Discover it. Have a Unique Word Count total and a general idea of any technical issues involved. Give your quote to the client (perhaps demo/impress them via the Live Preview). Win the bid.
2. Ingest & Translate
After you are entrusted with the project, collect all text content into a database (overcoming any technical issues that may arise in the process). When you have your data, export it to your CAT tool of choice or translate in the Workbench to a selection of target languages. Reimport and edit. Use our Proofreading and Workflow features to ensure quality.
3. Publish & Maintain
After the translation is greenlit by the proofreaders, you can verify the serving domain and publish the translated website. Add a language selector to the source site. Generally, it is with publishing a website that a deadline is met.
But don’t forget that a website is a living thing, with new content arriving every day - the final stage of website localization is always maintenance - making sure that new content gets translated according to schedule, all the while ensuring that visitors to the site will not be inconvenienced by bleedthrough of untranslated content.
Maintenance is the “long tail” of website translation - there are a variety of features in the proxy that make it a lot easier than it would be anyway else.
In the following pages, You will find everything there is to know about using the proxy. Keep reading!