Source Caches
SCs are your first line of defense against bleedthrough: it is a way of storing and reusing content that was received and picked up from the remote server (in other words, the source site). The goal of Source Caches is to create a controlled snapshot of the source content that you can safely use to translate and serve content over the proxy.
You might want to set up one Source Cache for publishing content and another to be used during translation. The content of the Source Cache being published should be highly translated, and new content should be collected in a different Source Cache to be used in Preview mode and during translation.
Benefits of Source Caches
If you have at least one Source Cache enabled and built, you have essentially decoupled new content from what you are serving over the proxy (you are in control of untranslated content).
Note: Source Caches can only be built by Scans. They will never pick up new content unless you expressly run a Content Extraction to update them.
See Case Study #1 for an in-depth coverage of this scenario.
Multiple Source Caches let you decouple published content from untranslated material - you are free to update any Source Caches you are not currently using for published content over the proxy. This way, you are always serving 100% translated content (using the Cache that is highly translated), and you can schedule for translation updates (on all the others you are free to update anytime with a Scan).
See Case Study #2 for an in-depth coverage of this scenario.
When to build?
The best time to build a Source Cache for the first time is during the first Content Extraction. By this time, you should have used Discovery a couple of times to gain a general understanding of the site structure and word count, and you have all necessary exclusion rules set up.
When you are confident in your Content Settings, set up a Source Cache before you run Content Scan (see below for setup directions) on the webpage and build it. This way, you will have a Source Cache that contains all content you’re basing your quote on.
Setting up a Source Cache
You can enable and create a new Source Cache by checking Enabled in the Page cache menu in the Dashboard. Note that at this point, the SC is enabled but unbuilt.
WARNING!: You have to build the Source Cache before it becomes functional!
Building the SC
After enabling the Source Cache, you need to Scan for content to build it. In the Content Scan Dialog, some options become available:
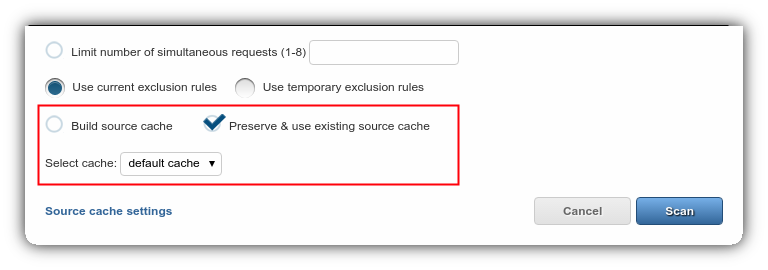
Check Build source cache and run the Scan. As a result of building the SC, all content that was set to be picked up by the Content Scan is added to the current SC.
If you are updating a SC, you can use the dropdown menu to select the cache you’d like to overwrite.
The ‘Preserve & use existing source cache‘ option ensures that a SC will not be written to during a Scan. Having both ‘Build source cache‘ and ‘Preserve & use existing source cache‘ enabled for a Scan will currently result in an inconsequential action (except for pages that are not in the current cache but referred - these will then be loaded into the cache).
Custom settings
If you have more than one Source Caches that you’ve built throughout multiple Content Scans, you can visit the Page Cache menu again and configure which Source Cache should be used for which proxy mode, as shown in the screenshot below:
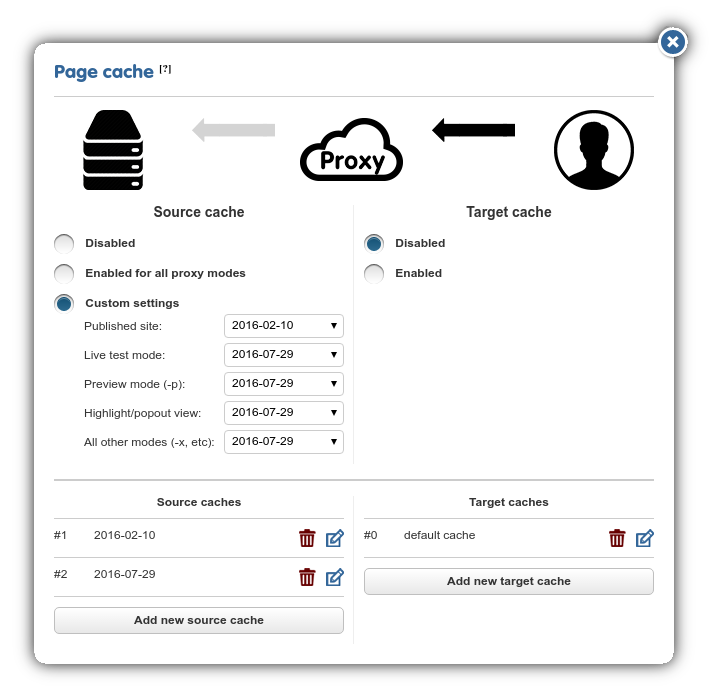
Choose a highly translated Source Cache for publishing, so that you can be sure that visitors to the proxied site will not experience bleedthrough.
Meanwhile, you can use other, more up-to-date Source Caches for the preview/live test etc. proxy modes to work on the translations of new content.
Your Source Cache setup is complete.